This post is one I’ve wanted to do for a while now. The problem is I don’t know how best to start or present the information since a lot of what it goes over is intertwined with itself. Like a tangled ball of thread, if you try to tease it apart by pulling on one side it tightens on another. This makes dealing with just one part in isolation impossible. You just have to start somewhere and do your best as you go along identifying how it is all connected. This is my attempt at that.
Fearing changes
¿Have you ever been too afraid to make change to code? If so, ¿why? If you add functionality to a workbook with VBA you shouldn’t be scared to extend or update that functionality as requirements change. Because they will change.
Nothing is worse than being too scared to edit code.
Being afraid to change code is an absurd fear. An absurd fear that was all too real when all I had was the VBIDE. The reason is I didn’t know any better. I wasn’t aware of the limitations with the VBIDE.
Truthfully I wasn’t scared of making a change. The change is easy. I was scared of not being able to get back to a working or stable state once the changes were made.
Exporting code modules
Use Rubberduck + Source Control = Magic.xlsm as the starting point. The workbook contains a single worksheet which uses a Worksheet_Change event to update the range where conditional formatting is applied. The conditional format changes the interior fill color of the range.
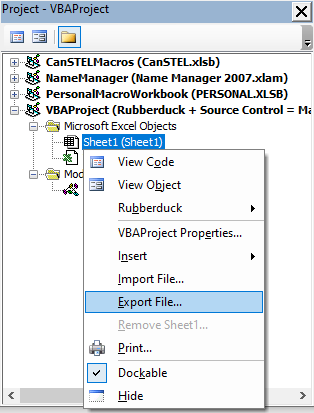
Open the workbook and navigate to the VBIDE (Hotkey: Alt+F11). In Project Explorer display the context menu by right clicking on Sheet1 then choosing Export File and saving it into a new Folder/Directory that you create. If Project Explorer isn’t shown in your IDE display it from the menu at the top View>Project Explorer (Hotkey: Ctrl+R). Choose where you want to export the module to. Repeat the same process for both ThisWorkbook and Module1.
Exporting a module using Project Explorer
With the modules exported from the host application (Excel) we have made them accessible for version control.
Version Control
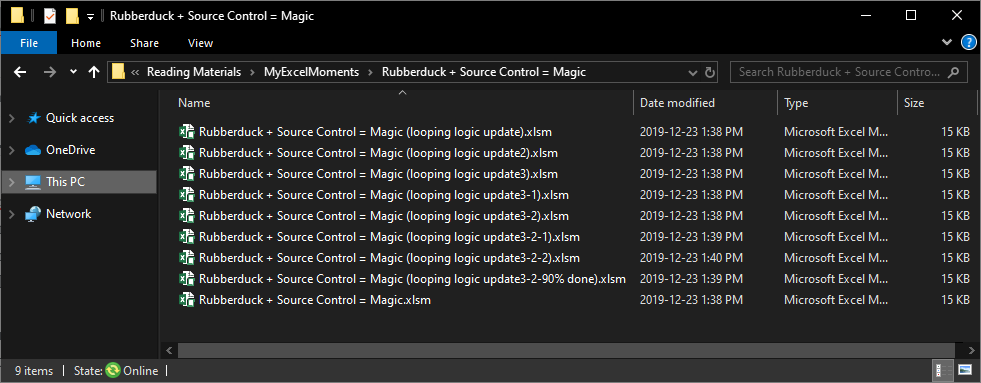
My overly-simplified-hand-wavey explanation of version control (VC or Source Control) is “Tracking when a change occurs. Hopefully with a descriptive message.” My previous method of version control was to do a Save as, creating a new workbook, differentiating it with a suffix. Below is an example of what a directory might contain as I made progress. It’s not pretty. There’s no way to know what those changes were unless they were saved as part of the suffix.
This naturally leads to bloat and has a few problems. The first deals with the obvious duplication of workbooks. Every successful update would be a new workbook. “Got that function updated, time to increment the suffix” meant ‘looping logic update’ became ‘looping logic update2’. The next time I updated the looping logic ‘looping logic update2’ became ‘looping logic update3’ ad nauseum. Finished the looping logic meant moving onto the next suffix. Messy and not maintainable
Another problem was when I’d comment out code and leave it there to stagnate. I’d start with something I knew how to do.
Public Sub StartingOut()
    Dim counter As Long
    For counter = 1 To 1000
        ActiveSheet.Cells(counter, "B").Value2 = counter
    Next
End Sub
As I learned better practices I used them. The code above populates one cell at a time. It’s slow and inefficient. The improved code below better, it first populates an array which is then transposed to populate a vertically range of cells in one step.
Public Sub UpdateWithBetterImplementation()
'    Dim counter As Long
'    For counter = 1 To 1000
'        ActiveSheet.Cells(counter, "B").Value2 = counter
'    Next

    Dim populateInSingleStatement() As Long
    populateInSingleStatement = GenerateArray(1, 1000)
    ActiveSheet.Cells(1, "B").Resize(RowSize:=1000).Value2 = Application.WorksheetFunction.Transpose(populateInSingleStatement)
End Sub

Private Function GenerateArray(ByVal startNumber As Long, ByVal numberOfElements) As Long()
    Dim arrayPopulation() As Long
    ReDim arrayPopulation(startNumber To numberOfElements - 1 + startNumber)
    Dim counter As Long
    For counter = LBound(arrayPopulation) To UBound(arrayPopulation)
        arrayPopulation(counter) = counter
    Next

    GenerateArray = arrayPopulation
End Function
The original implementation wasn’t deleted because of ‘what-if-I-need-it-later’ syndrome. If that sounds familiar, know that version control is your safety net. It allows you to go back to a previously saved state.
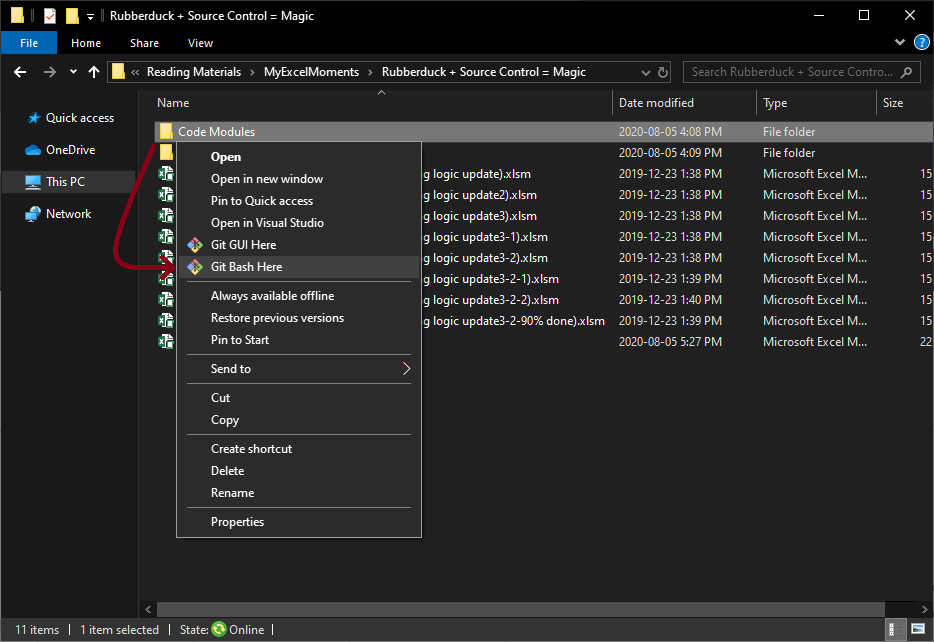
Since using git for source control I’ve dropped the previous kludgey workarounds I used to do. Download and install Git. You can leave everything default. For my installation I changed the default editor to Notepad++ out of preference. After installation is complete, navigate to where you saved the code modules to. Display the context menu by right clicking on the directory and choosing Git Bash Here.
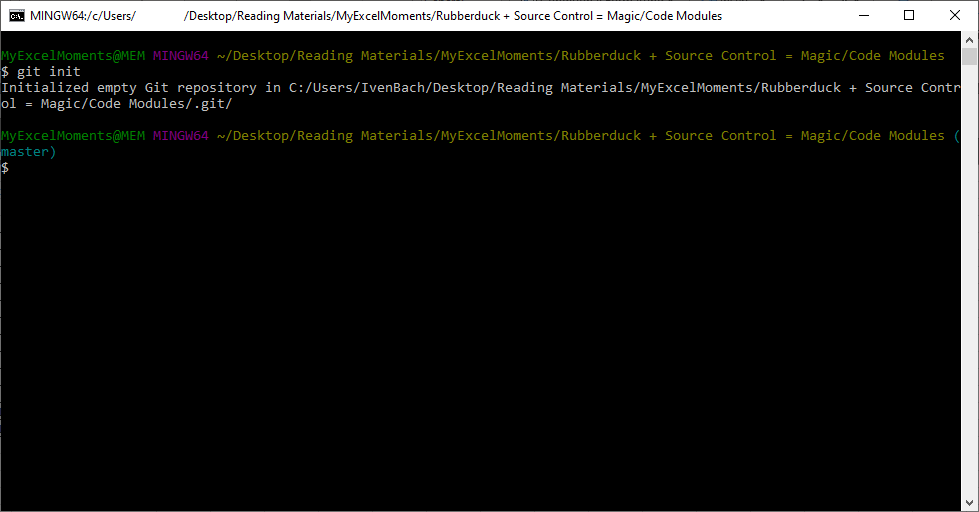
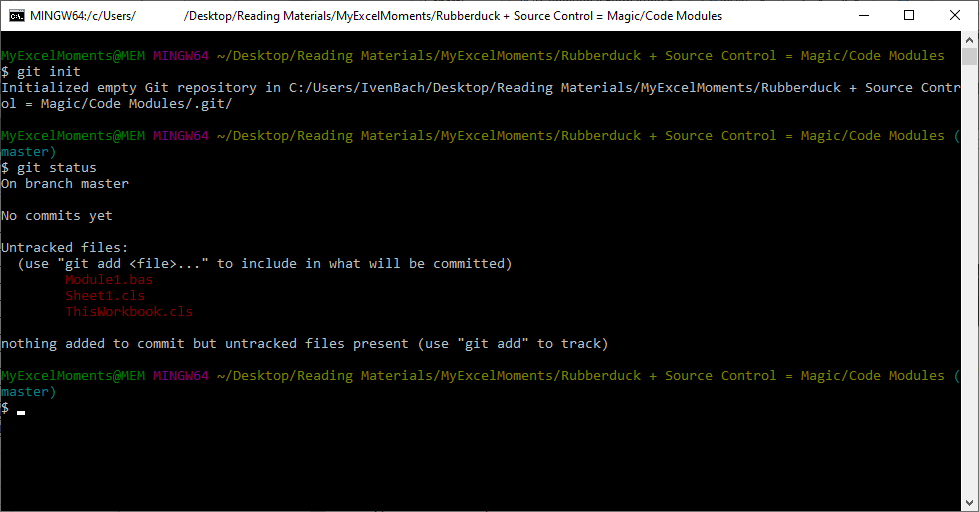
Opening the commandline to the directory
The commandline window opens to the directory chosen. The window is empty because the directory needs to be set up as a repository/repo. Type into the window git init executing the command with Enter. This designates the directory as a repository. The new line now indicates the default branch it’s on master in the blue text.
Repository initialized and default branch master is checked out
To view the files that are seen within the directory type git status executing the command with Enter. The files are shown in red because they are considered a change as they aren’t currently being tracked by git.
Files seen by git within the directory
We want the files to be tracked. To track them we add them to the index by typing git add . executing the commnad with Enter. The intentional . (period) indicates you want all files to be added to the index (aka staging area). The staging area is where files are placed before they are committed. Files are added as they are presently-at-this-moment, like a photo snapshot. Any further edits to the file need to be added to be recorded, as will be done a bit later. Check the status again with git status to show that the files were added, indicated by green text, and ready to be tracked.
The files, shown in green, under “Changes to be committed” will now be tracked as part of any subsequent commits.
We commit the changes to the repository with git commit. The text editor chosen during installation opens up to allow you to enter a message in. It’s convention to use Initial commit for the first commit.
Always strive for good commit messages.
A good commit message will help your future self or another developer down the line when you/they are trying to understand why this commit occurred. Save the message and close the text editor.
After closing the editor a confirmation of what was added is displayed in the command line window, indicated by create mode 100644 Module1.bas for each added file. Executing git status again shows that within the working tree, the directory the files were exported to, nothing has been edited since we just committed the changes. With that commit we now have recorded a snapshot of our code.
Review previous commits with git log. Right now there’s only the initial commit so there’s not much to show but as more work is committed the value of reviewing grows.
Reviewing the log of commits
Editing more and committing those edits
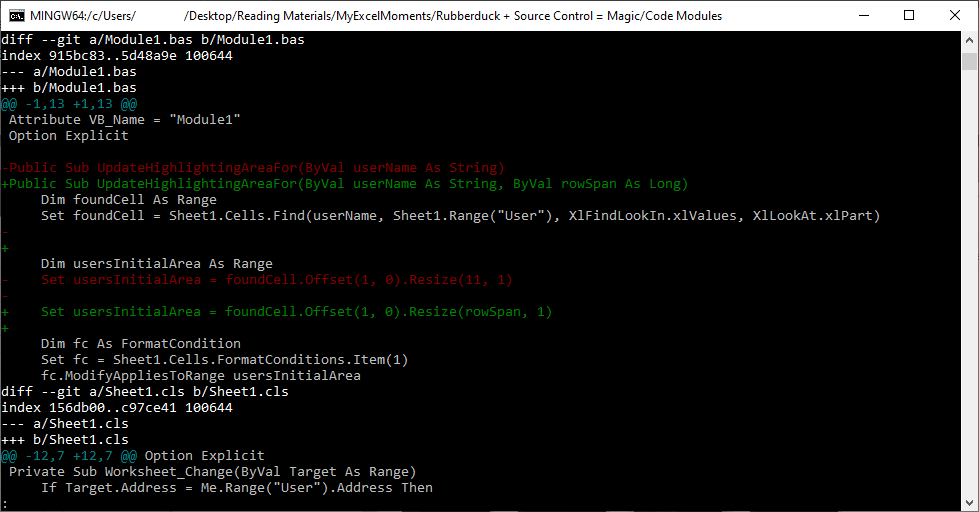
With the repository initialized it’s time to make some edits and thereafter export them. Return to the VBIDE, open Module1 and locate the line Set usersInitialArea = foundCell.Offset(1, 0).Resize(11, 1). Instead of using the number 11, which has no meaning, add a descriptive parameter name and supply an argument to it. The reason for this is this change indicates to the user that the code is using that number to span a number of rows, as should be evident by the worksheet having 11 rows of instruction.
The below code includes changes to Module1.UpdateHighlightingAreaFor.
Public Sub UpdateHighlightingAreaFor(ByVal userName As String, ByVal rowSpan As Long)
    Dim foundCell As Range
    Set foundCell = Sheet1.Cells.Find(userName, Sheet1.Range("User"), XlFindLookIn.xlValues, XlLookAt.xlPart)

    Dim usersInitialArea As Range
    Set usersInitialArea = foundCell.Offset(1, 0).Resize(rowSpan, 1)

    Dim fc As FormatCondition
    Set fc = Sheet1.Cells.FormatConditions.Item(1)
    fc.ModifyAppliesToRange usersInitialArea
End Sub
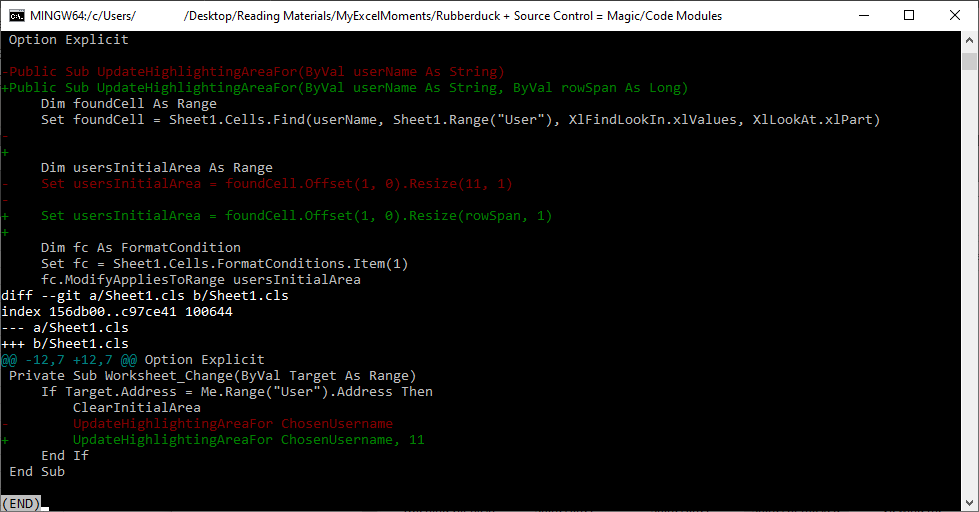
With this change complete it’s time to compile our code knowing there will be an error. From the menu at the top choose Debug>Compile to be informed of the error and taken to its location. This error occurs because the change we made requires an argument be supplied to the parameter. Update call site to include the required number UpdateHighlightingAreaFor ChosenUsername, 11. Compile again after the edit is done to ensure everything is OK. Save the workbook and export Module1 and Sheet1 to the same directory overwriting the previous files.
Because git is tracking changes to those files execute git status and indicates there was an edit made.
Tracked files are indicated as being modified
To view the differences use git diff. This command shows the changes made to tracked files since they were last committed.
Red = Removal
Green = Addition/Edit
The first thing I want to draw your attention to is the : (colon) on the last line. The colon indicates more content is waiting to be displayed, beyond what is currently shown.
First page of differences shown
To display the additional content use the Spacebar. That will display another screens worth of additional text. This continues until (END) is displayed indicating the end of the diff. In our case we needed only a few additional lines to display. To exit this diff state press the q key to quit the difference comparison.
Last differences shown indicated with (END)
Add the modified file Module1 first with git add Module1.bas. See that it was added with git status shown below. The file name is under the Changes to be committed section in green. Sheet1.cls has changes but still needs to be staged/added for the next commit. Add it now with git add Sheet1.cls. ***Note: Multiple files can be added in a single step by separating each file name with a space git add File1.txt File2.txt File3.txt.
With both file changes added commit them to the repo with git commit. Include a description of what was done in this commit.
Review the commit just made with git log. The commits are shown in reverse chronological order with the most recent on top. Good commit messages take effort to do well. When done correctly they are an invaluable when reviewing past history.
Log of commits is in reverse chronological order.
Creating a branch with git for testing
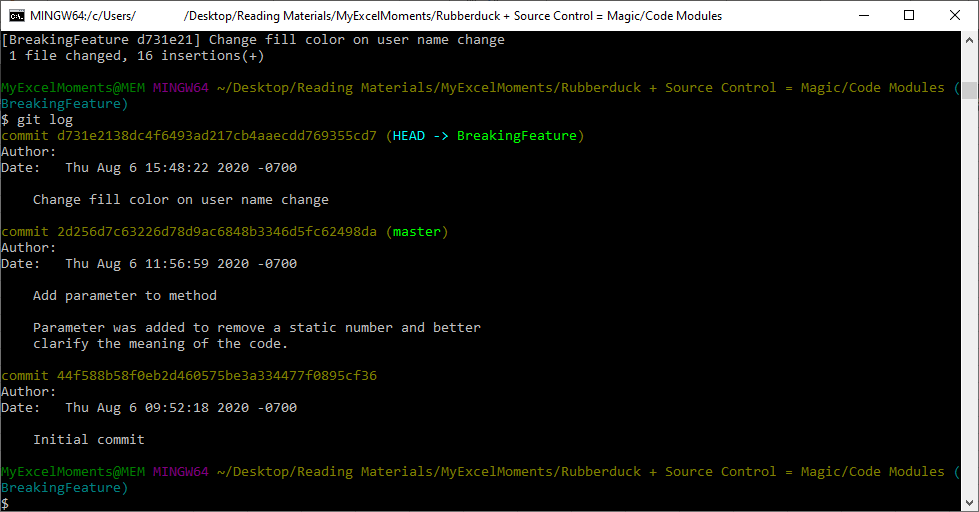
The code we have works but we need to add more features. Since we are adding untested features we’re note entirely sure if it’s going to work out. We don’t want to trash our working code. This is where we create a new branch, or fork in the development path. In the commandline window type git checkout -b BreakingFeature and execute it with Enter. This will check out a new branch and name it the supplied name of BreakingFeature. You can see this with the branch name in blue after the branch is created and switched to.
We now proceed with changing the interior fill color of the conditional formatting. After a bit of work we end up with Module1 written as below.
Public Sub UpdateHighlightingAreaFor(ByVal userName As String, ByVal rowSpan As Long)
    Dim foundCell As Range
    Set foundCell = Sheet1.Cells.Find(userName, Sheet1.Range("User"), XlFindLookIn.xlValues, XlLookAt.xlPart)

    Dim usersInitialArea As Range
    Set usersInitialArea = foundCell.Offset(1, 0).Resize(rowSpan, 1)

    Dim fc As FormatCondition
    Set fc = Sheet1.Cells.FormatConditions.Item(1)
    fc.ModifyAppliesToRange usersInitialArea
    fc.Interior.Color = UsersBackgroundColor(userName)
End Sub

Private Function UsersBackgroundColor(ByVal userName As String) As Long
    Select Case userName
        Case "Andy"
            UsersBackgroundColor = XlRgbColor.rgbRed
        Case "Barbara"
            UsersBackgroundColor = XlRgbColor.rgbOrange
        Case "Cecilia"
            UsersBackgroundColor = XlRgbColor.rgbYellow
        Case "David"
            UsersBackgroundColor = XlRgbColor.rgbGreen
        Case "Eileen"
            UsersBackgroundColor = XlRgbColor.rgbBlue
    End Select
End Function
To see the effect of the edit, change the user in cell C2. Once you’ve reviewed the change save the workbook and export Module1 to the git repo. Executing git status shows you that Module1.bas was modified. Executing git diff . shows everything that changed since the last commit. The private function was added and is called to update the interior color on the conditional formatting.
Add the file with git add Module1.bas and commit the change executing git commit -m "Change fill color on user name change". The -m flag is short for message and lets you include the message directly. Again you can review the commit with git log.
After a short break to think over your edit you come back and decide the color change is distracting. You decide to remove your work. Because you have git tracking your files you can go back to the master branch before you made your commits. Navigate to the directory where you’ve been exporting your files. If you’re on windows a quick way to do this is executing explorer.exe . which opens a file explorer to the current directory. Open Module1.bas with a text editor to see that it has the UsersBackgroundColor function. After you’ve seen the changes close editor.
Magic time. In the commandline window execute git checkout master to switch back to the master branch. Remember that this is the branch without the color change function. Open up Module1.bas to verify that UsersBackgroundColor isn’t there. When you change branches git restores all the files within the directory to that snapshot-in-time when the commit occurred.
To restore the workbook to before the color changing edit you need to import the modules.
Vanilla Version Control
If you use version control with a vanilla VBIDE it’s awkward and clunky at best. For any project larger than a couple modules it usually feels downright abusive. That’s because you have to export each module individually. For. Every. Single. Edit. And hope really hard you didn’t miss a module. If When you do miss one and your project no longer compiles you will be WTFing for a while as to why it won’t compile. Then you realize a module was missed.
Importing modules is worse because importing won’t overwrite an existing module with the same name. Oh how I so wished it did… That would make it easy. When a name already exists the VBIDE appends a suffix to the module to uniquely identify it, a class named People becomes People1. Now you have to delete the original People module and remove the suffix from People1 to so it matches the non-suffixed name… Painful. Woefully so.
Do this by importing the Module1.bas file back into the workbook. In Project explorer right click the Workbook and select Import File. When you import Module1 it comes in as Module11. Having good module names is important, the default names just don’t suffice. Name them well to eliminate confusion form Module1, Module11, etc. Remove the outdated module then rename the imported module.
Follow the duck
There’s a much better way and that is by using https://rubberduckvba.com/ aka Rubberduck (RD). Download the latest stable release and install it. ¿What is RD? It’s an add-in that gives you the tools you didn’t know you needed. ¿Have concerns about downloading RD? Don’t worry because it is Open Source Software (OSS), you can review the code that’s hosted on https://github.com/rubberduck-vba/Rubberduck. Many of the tools it brings are listed at https://rubberduckvba.com/Features.
VC + RD = Magic
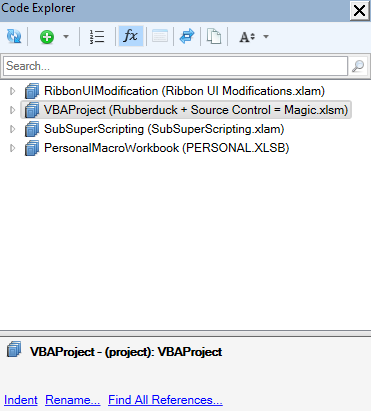
Once you’ve installed RD turn on Code Explorer (CE) by going to the new menu item at the top Rubberduck>Navigate>Code Explorer. The CE is like the Project Explorer in the vanilla VBIDE but loaded with tools. The feature we’ll be using right now is the export feature.
Looking at the CE right now isn’t much. This reason for this is RD needs to parse the project before it can display the contents. Click where it says refresh to parse to enable the CE to display the projects contents.
Once the parse has been successful it will display the list of all loaded projects. Because I have other add ins they are listed as well.
Right click on the current example workbook within CE and choose Export Project exporting the modules tho the directory we’ve been working with.
After the project has been exported return to the git commandline window executing git status to see what has changed. Below you see that Module1.bas has been modified.
Execute git diff Module1.bas to show the difference between the files. Remember that we changed from the branch containing the color change feature back to master which didn’t have it. The diff shows the code as being added because it doesn’t exist on the master branch.
Since we do not want this edit we will restore the file to what was committed to the master branch by executing git restore Module1.bas. Execute git status to see that Module1.bas no longer displays as having a change.
The 2 files that are shown are because of how RD treats the document classes. They correspond the *.cls files Sheet1 and ThisWorkbook respectively. Delete the previous files by executing rm Sheet1.cls ThisWorkbook.cls. Confirming their deletion with git status afterwards, shown in green.
We want to track the doccls files as their RD replacements by executing git add Sheet1.doccls ThisWorkbook.doccls again confirming with git status after.
git is usually pretty good at determining when a file is renamed based on the contents. Sheet1 was understood to be a rename whereas ThisWorkbook wasn’t.
With these changes added commit them with git commit -m "Update export files to use RD doccls files". They are now being tracked with git.
The last step is to import the documents back into Excel. Right click on the workbook in CE to display the context menu>Sync Project>Update Component from Files. The is a big difference between the two options:
Update Components: Imports the files, not editing other files.
Replace Components: Imports files, deletes anything not part of the import.
Select all the files and import them with Open.
Go back to the VBIDE and see that the changes were brought in, each file was imported without having to rename any of them.
Summarizing everything
Don’t fear changes. Change is required. Let git, or whatever your preferred version control is, take care of tracking those changes.
Because Excel hosts the modules, you need to export them so they are available for version control. Once the modules have been exported and under version control changes can be reviewed to ensure only those you intend to make are introduced.
Create branches for features. By doing this you can discard them and return to a stable state by importing a clean buildable branch.
Merging, not featured in this post, is a way to bring changes from another branch into your main branch.
Use good commit messages. It takes effort, like anything worth doing, but good messages will make reviewing previous changes much easier.
It took me a while to learn what git was all about and why it is needed. Once I did and started using it developing better solutions for Excel/VBA became a lot easier. Hopefully my one-handed-half-blind-monkey-pig explanation made sense and was beneficial.
 This naturally leads to bloat and has a few problems. The first deals with the obvious duplication of workbooks. Every successful update would be a new workbook. “Got that function updated, time to increment the suffix” meant ‘looping logic update’ became ‘looping logic update2’. The next time I updated the looping logic ‘looping logic update2’ became ‘looping logic update3’ ad nauseum. Finished the looping logic meant moving onto the next suffix. Messy and not maintainable
Another problem was when I’d comment out code and leave it there to stagnate. I’d start with something I knew how to do.
This naturally leads to bloat and has a few problems. The first deals with the obvious duplication of workbooks. Every successful update would be a new workbook. “Got that function updated, time to increment the suffix” meant ‘looping logic update’ became ‘looping logic update2’. The next time I updated the looping logic ‘looping logic update2’ became ‘looping logic update3’ ad nauseum. Finished the looping logic meant moving onto the next suffix. Messy and not maintainable
Another problem was when I’d comment out code and leave it there to stagnate. I’d start with something I knew how to do.
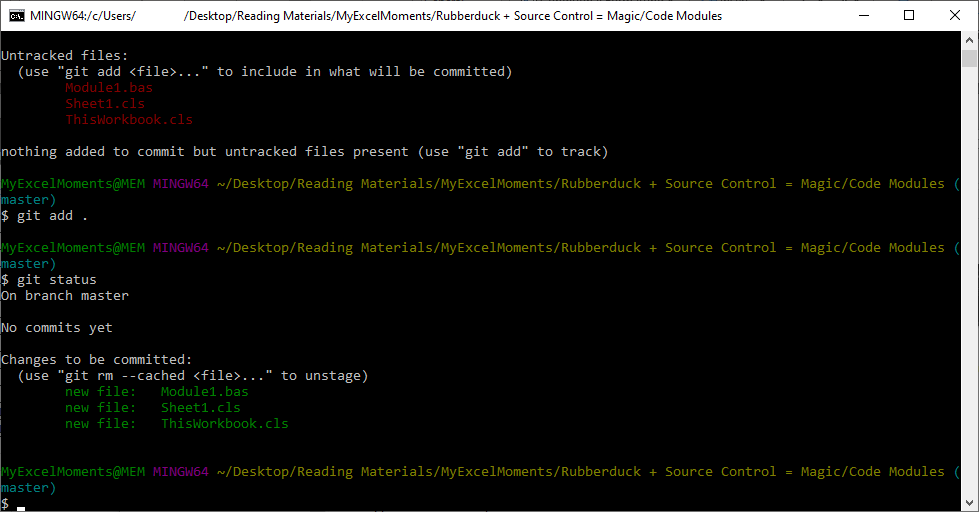 The files, shown in green, under “Changes to be committed” will now be tracked as part of any subsequent commits.
We commit the changes to the repository with
The files, shown in green, under “Changes to be committed” will now be tracked as part of any subsequent commits.
We commit the changes to the repository with 


 With both file changes added commit them to the repo with
 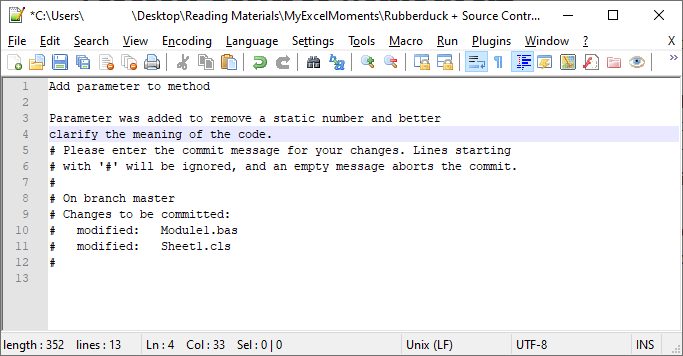 Review the commit just made with
 We now proceed with changing the interior fill color of the conditional formatting. After a bit of work we end up with Module1 written as below.
 After a short break to think over your edit you come back and decide the color change is distracting. You decide to remove your work. Because you have git tracking your files you can go back to the
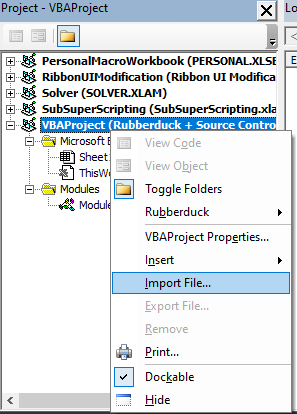


 Right click on the current example workbook within CE and choose Export Project exporting the modules tho the directory we’ve been working with.
 After the project has been exported return to the git commandline window executing
 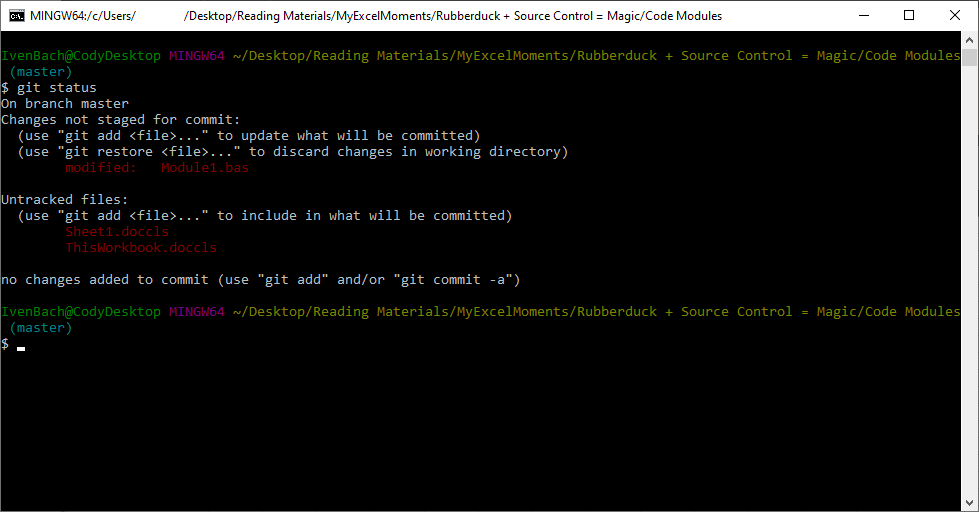 Execute
 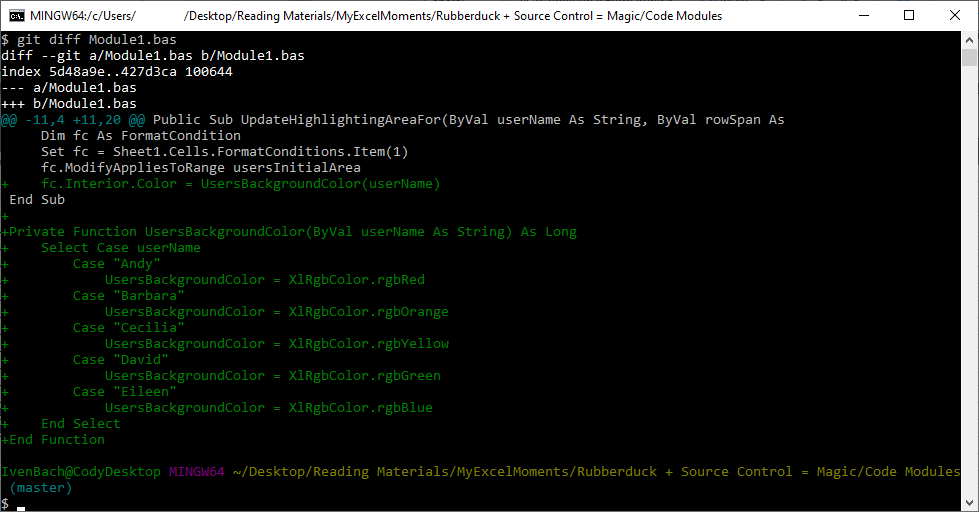 Since we do not want this edit we will restore the file to what was committed to the master branch by executing
 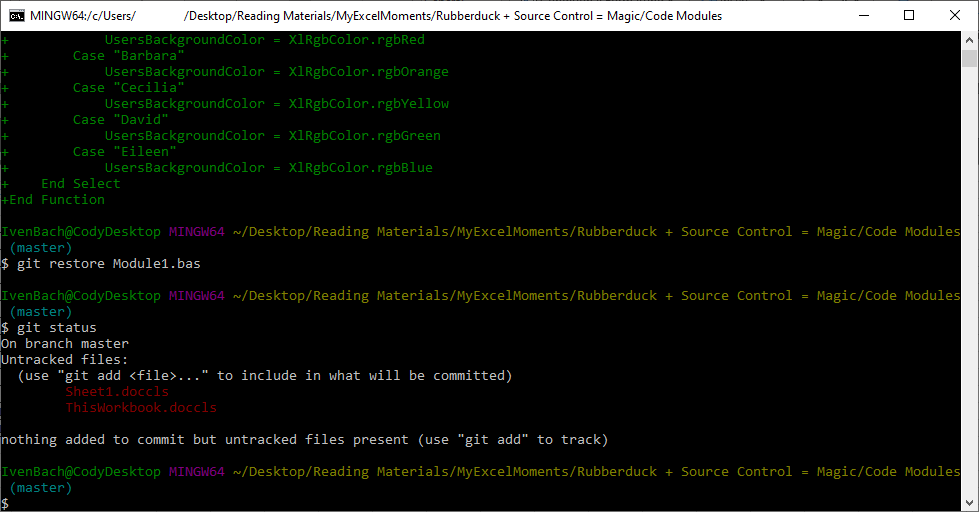 The 2 files that are shown are because of how RD treats the document classes. They correspond the
 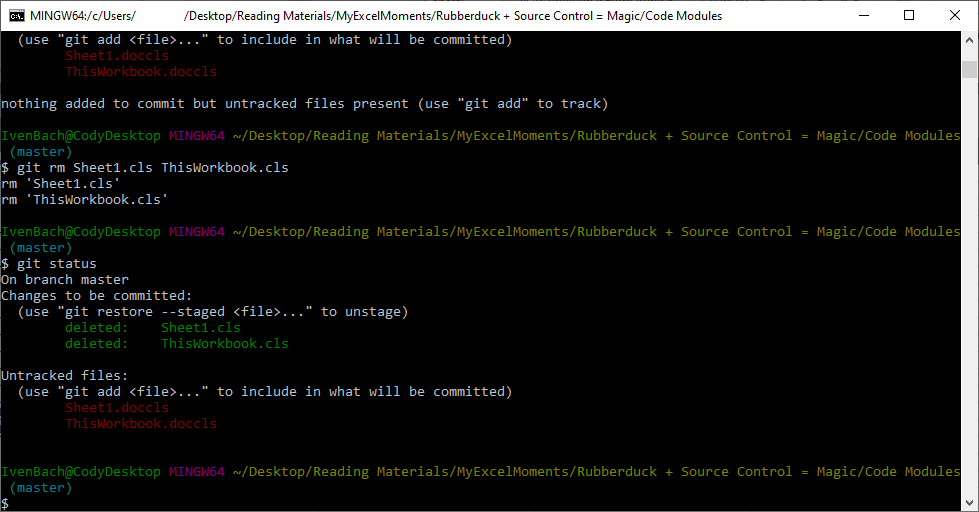 We want to track the doccls files as their RD replacements by executing
 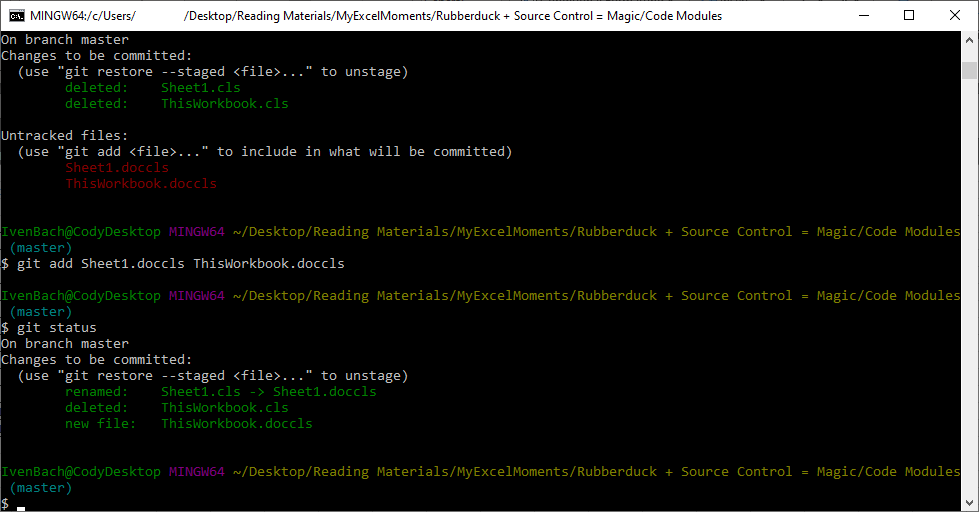 git is usually pretty good at determining when a file is renamed based on the contents. Sheet1 was understood to be a rename whereas ThisWorkbook wasn’t.
With these changes added commit them with
git is usually pretty good at determining when a file is renamed based on the contents. Sheet1 was understood to be a rename whereas ThisWorkbook wasn’t.
With these changes added commit them with 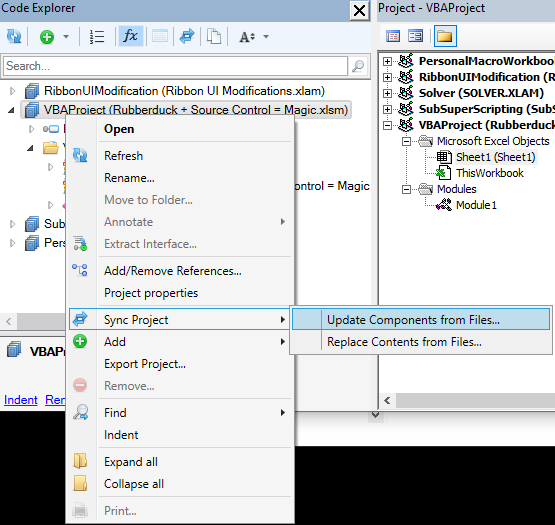 Select all the files and import them with Open.
 Go back to the VBIDE and see that the changes were brought in, each file was imported without having to rename any of them.
